
The User Interface (UI) allows users to create new broadcasts from different sources.
Main broadcast type selection
Via the broadcast type selection you select the way you want to carry out your broadcast, basically you select the source of your broadcast.
➡️ You can generate a broadcast:
- Manual – input all necessary data in the UI
- File – upload a .CSV file that contains the necessary data
- Template – use a predefined template

Select the type of broadcast you want to create.
Manual Broadcasts
Manual broadcast means you enter all relevant information directly via the user interface
➡️ Once you have the broadcast type selected, continue with selecting the parameters in the parameter section.
Here you select your transportcode (your senderID or source number), the destination phone number(s) and the message you want to send.
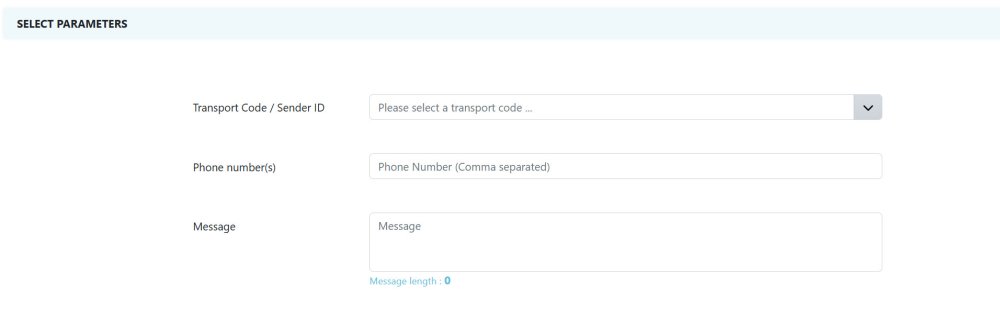
Transport Code (optional): For accounts with multiple source numbers (the ‘From’ number when sending a message), a specific source number may be designated with this parameter. Only numbers that have been assigned to an account may be used.
Phone number(s) (optional): You can specify the phone numbers you want to send your broadcasts here, separated by comma.
Message (optional): Specify the message to be sent to ALL destination numbers.
Now you can either start your broadcast immediately by hitting the CREATE button or move on to the optional parameter section.
➡️ In case you need additional optional parameters for your broadcast, expand the OPTIONAL FIELDS section.
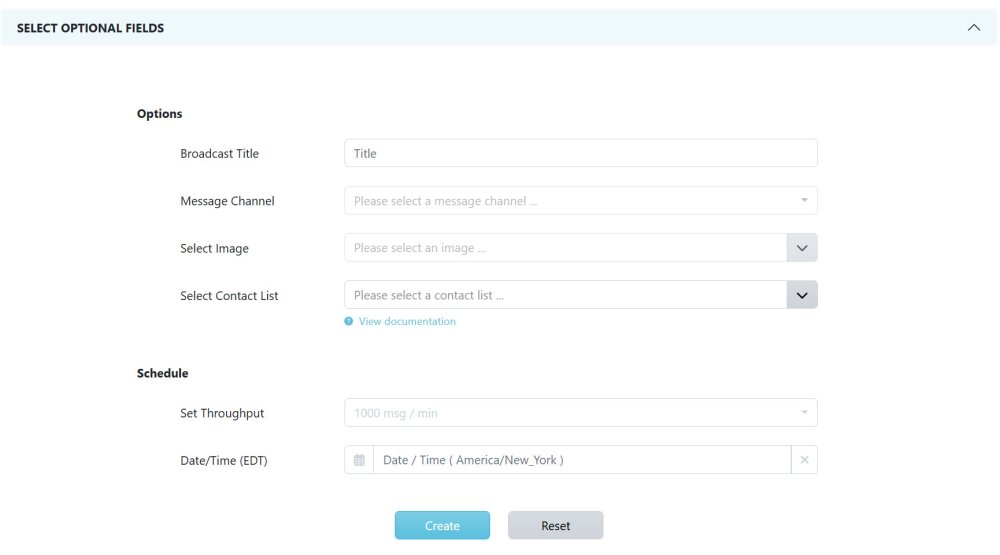
➡️ In this section you can set custom titles, select images (if your senderID supports it), create your broadcats from contact list, schedule your broadcasts for specific date&time and more.
Title: The reference name of the broadcast. Titles with dates are recommended to assist in locating and changing files if necessary.
Message Channel: In case you have multiple senderIDs/transportcodes and or transportcodes supporting multiple different channels (like SMS, MMS, RCS).
Select Image: If your transportcode is provisioned for multimedia sending you can use this feature to send the same image to all mobile numbers in your broadcast.
Use Contact List: In case you want to send the broadcast to a pre-define list of contacts. Expand the contact list editor to upload new lists, download lists to edit them or delete existing contact lists. Contact lists need to be .CSV files that only contain a list of destination phone numbers.
Set Throughput: The speed in messages per minute that the broadcast file will be sent. The default is 1000. For customer service and marketing applications you may wish to lower the speed if you are sending a large number of messages that have a call-to-action (e.g. “call or text now…” ) to prevent an avalanche of live calls from recipients.
Date/Time: The date/time that you would like the broadcast to begin. If no date/time is designated here or in an uploaded CSV file, the broadcast will begin immediately (it can take a couple minutes to process larger files). The time zone used is configured for each account.
➡️ Once all your required parameters are selected, start or schedule your broadcast by hitting the CREATE button.
Broadcast History
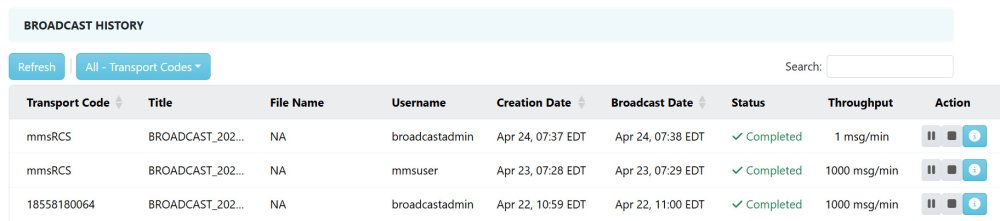
The Broadcast History section provides an overview for all broadcasts, ongoing, successfully completed ones and failed broadcasts.
Via the action buttons on the right you can:
- Pause ongoing broadcasts and resume them later
- Terminate ongoing broadcasts
- View details (metadata)
- Generate and download reports specific to a particular broadcast
Broadcasts from a source file
➡️ Your broadcasts is generated by uploading a .CSV broadcast file.
See the FILE CREATION part of this manual on how to generate and upload valid broadcast files.
➡️ Continue with selecting the parameters in the parameter section.
Transport Code: For accounts with multiple source numbers (the ‘From’ number when sending a message), a specific source number may be designated with this parameter. Only numbers that have been assigned to an account may be used.
Select Broadcast File: Here you will select the Broadcast file to be uploaded. First you must create a valid CSV file. Please refer to section 4. Creating and Uploading a Broadcast file for instructions.
Now you can either start your broadcast immediately by hitting the CREATE button or move on to the optional parameter section.
➡️ In case you need additional optional parameters for your broadcast, expand the OPTIONAL FIELDS section and select the required optional parameters (detailed description in the previous section).
➡️ Once all your required parameters are selected, start or schedule your broadcast by hitting the CREATE button.
Broadcasts from a Template
You use a predefined template to send out your broadcast.
➡️ Continue with selecting the parameters in the parameter section.
Transport Code: For accounts with multiple source numbers (the ‘From’ number when sending a message), a specific source number may be designated with this parameter. Only numbers that have been assigned to an account may be used.
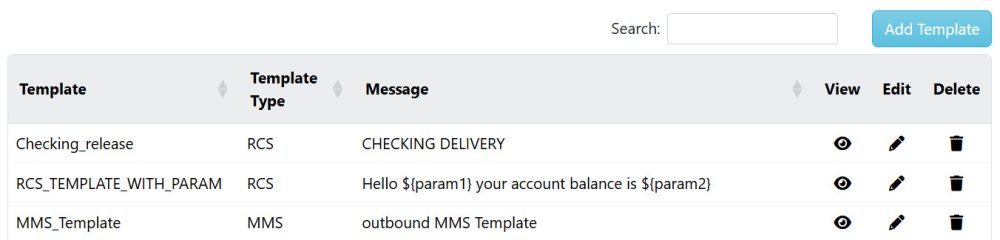
➡️ Click ADD TEMPLATE to create a new template or edit a existing one.
You can also preview templates via the VIE option or delete templates here.
The template editor lets you create new templates and edit existing ones.
- Open the editor by clicking ADD TEMPLATE
- Edit a existing template by using EDIT
- Review a preview via the VIEW button
- Remove a existing template via the DELETE button
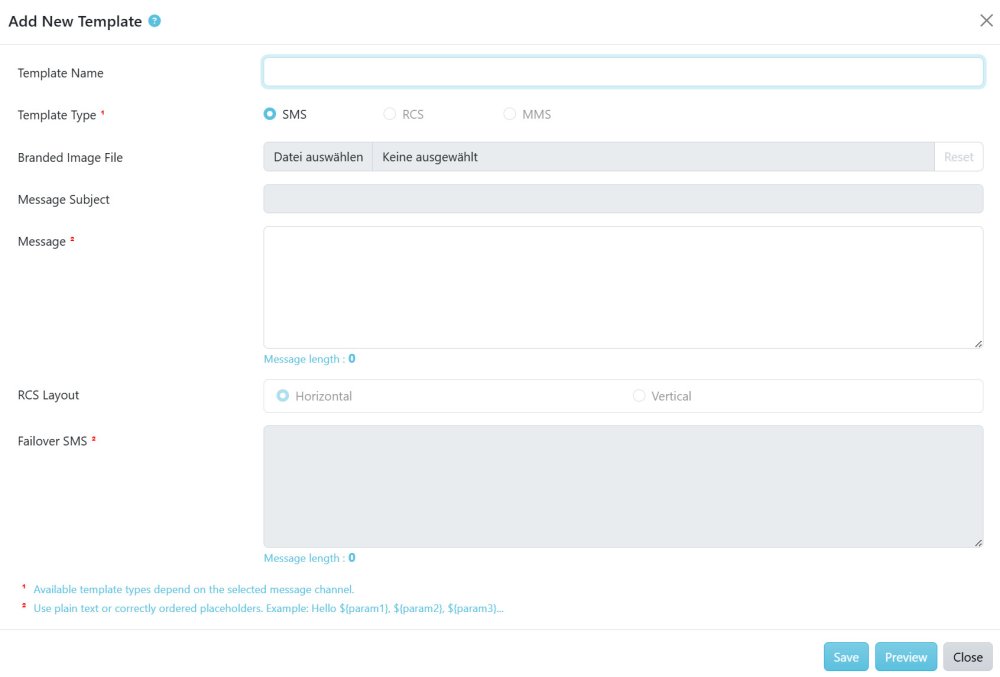
➡️ Inside the template editor
- Select a name for your template
- Select a template tpye (SMS, MMS, RCS), depending on the type of the transportcode.
- Choose an image in case of a Media or RCS template (optional)
- Choose a template message
- Choose the layout (in case of a RCS message)
- Choose the failover message (in case of a RCS message)
Hit SAVE or UPDATE to store your template.
Now you can either start your broadcast immediately by hitting the CREATE button or move on to the optional parameter section (see details in the MANUAL section).
➡️ Once all your required parameters are selected, start or schedule your broadcast by hitting the CREATE button.